We have many tutorials and practice labs on our site to help you understand the concepts of the CCNA exam. We have summarized them here in one place and categorized them into specific topics to make your learning easier.
================== CCNA Tutorials ==================
================= CCNA Practice Labs =================
Practice labs help individuals and professionals gain practical experience with networking technologies by configuring routers & switches on the emulators
================ CCNA Lab Challenges ================
Lab Challenges require you to configure or troubleshooting preconfigured labs
Spine-leaf architecture is a modern network topology widely used in data centers and cloud environments. It’s designed to offer improved scalability, high availability, and consistent low-latency communication. Unlike traditional three-tiered hierarchical networks (core, distribution, access layers), the spine-leaf architecture consists of only two layers of switches: spine and leaf switches.
|
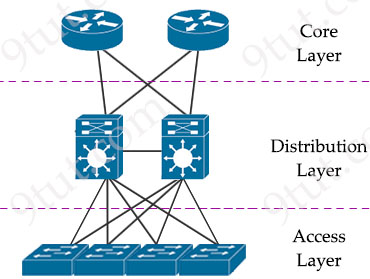
Traditional three-tier architecture
|
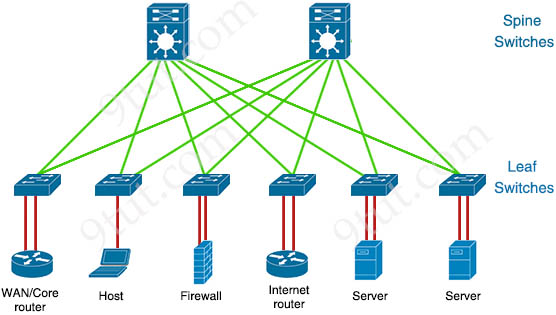 Spine-Leaf Architecture Spine-Leaf Architecture |
The spine layer consists of switches that perform routing and work as the core of the network. The leaf layer involves access switches that connect to servers, storage devices, and other end-users. This structure helps data center networks reduce hop count, reduce network latency and prevent bottlenecks, which are main issues of three-tier architecture.
READ MORE…
Artificial intelligence (AI) is full of concepts that seem familiar at first glance, but often reveal much more complexity upon closer examination. One such example is the distinction between Generative AI and Predictive AI. These terms are often confused, but understanding the difference is crucial. Let’s explore them in more detail.

READ MORE…
An API (Application Programming Interface) allows different software applications to communicate with each other. It defines the methods and data formats that applications can use to request and exchange data.
REST (REpresentational State Transfer) is an architectural style for designing networked applications. It relies on a stateless, client-server, cacheable communications protocol – the HTTP. RESTful applications use HTTP requests to perform CRUD (Create, Read, Update, Delete) operations on resources and return data in various formats, often JSON or XML.

An API that follows the REST standard is called a RESTful API or REST API. A REST implementation should be stateless. It means the two parties don’t need to store any information about each other, and every request and response (cycle) is independent from all others. It uses standard HTTP methods and can return data in various formats, often JSON or XML. READ MORE…
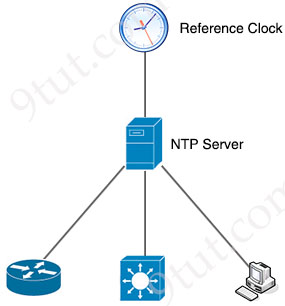
The Network Time Protocol (NTP) is a crucial service not only for Cisco devices but for most network devices. Any device needs to be accurately synchronized with a reliable time source such as an NTP server.
For networking devices, precise timekeeping is very important because many services depend on it. A common and frequently used example is logging and SNMP.
READ MORE…
DHCP Snooping is a Layer 2 security feature that can be configured on a switch to listen DHCP traffic and block DHCP OFFER and DHCP ACK packets (which can only be sent from a DHCP server) on untrusted ports.
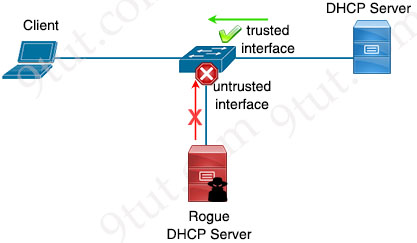
DHCP Snooping is very easy to configure. We only need to:
1. Turn this feature on the switch
2. Configure trusted interface(s). Other interfaces are untrusted by default.
Trusted interface is the interface that is connected to our DHCP server so that all DHCP messages are allowed.
DHCP Snooping feature also creates a table of IP – MAC address mapping which lists client MAC addresses, DHCP-assigned IP addresses…
READ MORE…
Most traditional devices use a distributed architecture, in which each control plane is resided in a networking device. Each device will make its own decision. Therefore they need to communicate with each other via messages to work correctly.
In contrast to distributed architecture, centralized (or controller-based) architectures centralizes the control of networking devices into one device, called SDN controller. This is also the main idea when creating SDN. In other words, SDN creates a king to control the whole networking kingdom!

READ MORE…
We all know when a packet reaches a router interface, the router will send the packet to the destination. But how can a router determines which route is the best to use to send the packet? In this tutorial we will learn more about how a router makes the forwarding decision.
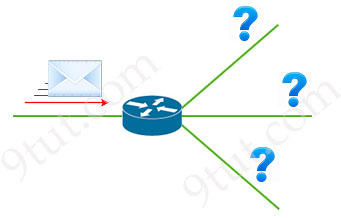
To make the routing decision, the router must first build a table which contains all the best routes. When the packets arrive, the router just needs to check this table to choose the best match. This is called the routing table.
READ MORE…
One of the most popular way to access a Cisco router remotely is using Telnet but it is an unsecured method as the data is sent unencrypted. If a bad person grabs data from a Telnet session, he can see details like a user’s username and password, giving them access to your router.
SSH (Secure Shell) is a secure method for remote access as it includes authentication and encryption. To do this, it uses a RSA public/private keypair. In this tutorial we are going to learn how to configure SSH for R1 to accept remote SSH access with the topology below.

READ MORE…
In the digital world, where we use computers and the internet for many things, keeping our information safe is one of the most important tasks. This tutorial will explore some of the popular and important security concepts, making it easier for us to understand and use them to keep our online world secure and private.
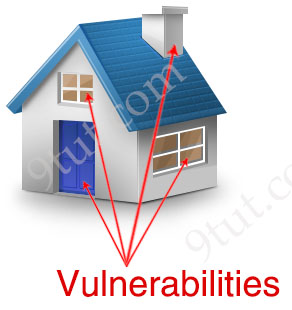
Let’s take an example of a common house, which is typically built using bricks, stones, or concrete blocks. They are very strong materials which are considered to be secure from theft. But a house cannot be used easily without doors and windows so that the owners can enter and exit using keys. But it means anyone else can gain access as well with some hand tools. The doors and windows (and chimney) are considered vulnerabilities.
In cybersecurity, a vulnerability refers to a weakness or flaw in a system’s design, implementation, or operation that could be exploited by attackers to compromise the system’s security.
READ MORE…
Quality of Service (QoS) is a tool that allows our network to prioritize certain types of traffic. QoS defines the actions that a device can apply to a message between the time it enters the device until it exits the device. These actions are called per-hop behaviors (PHBs). With PHBs, we can discard, delay, or even change the header field of each packet. The goal of a PHB is to provide a specified amount of network resources to a class of traffic on a contiguous network.
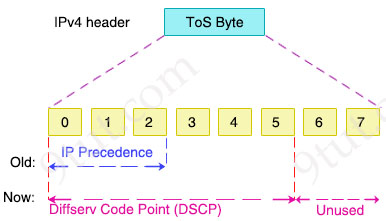
PHB uses a set of codepoints to mark packets with different levels of priority. These codepoints are embedded in the Differentiated Services Code Point (DSCP) field of the Type Of Service (ToS) field of the IP header.
READ MORE…
By default, all interfaces on a Cisco switch are in an enabled state, meaning that anyone can potentially connect to your network through a wall socket, posing a security risk. Port Security is a feature that enhances the security of Cisco switches by controlling access to Ethernet ports based on the MAC addresses of connected devices.
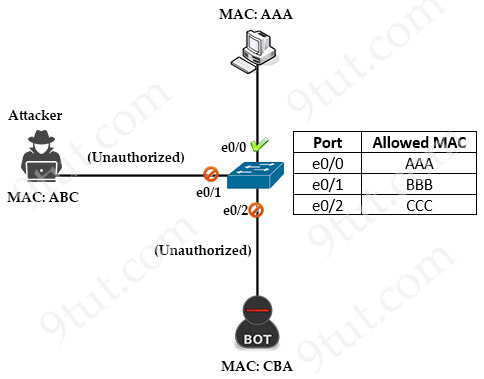
Port Security allows network administrators to associate only specific MAC addresses or set a maximum number of MAC addresses with each switch port. This association restricts access to the interface, ensuring that only authorized devices with recognized MAC addresses can use it. If an unauthorized device attempts to connect, you can configure the switch to take predefined actions, such as discarding the incoming traffic, sending a warning message or shutting down the port to mitigate the security threat.
In the figure below, only host with MAC address of AAA (just for example. In fact the MAC address must be 48 bits) was configured to connect to the switch port while other MAC addresses are blocked:
READ MORE…
Besides Ansible and Chef, Puppet is another automation tool in CCNA certification so in this tutorial we will learn about it.
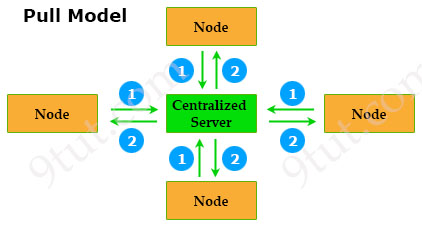
Puppet is built on server-client architecture which comprises a master (centralized server) and some/many nodes (clients). In each node, a Puppet Agent is installed to communicate with the Puppet Master. Puppet Master is the place where all Puppet codes are written and stored. These codes dictate the instructions for performing various tasks for the client. If the Clients need something, they simply request them.
Puppet is based on a Pull deployment model, where the nodes check in regularly after every 1800 seconds with the Master to see if anything needs to be updated in the agent. If anything needs to be updated the agent pulls the necessary Puppet codes from the Master and performs required actions.
READ MORE…


